Aquabot Test Project – Part 3
Hi guys!

Now we will start the automation project in cypress \o/.

A little intro
Cypress is a front-end testing tool built for the modern web. It enables you to write E2E tests, Integration tests, and Unit tests.
You can also make API calls in your UI testing project or create your API automation project.
It can test anything that runs in a browser.
They have a very useful doc page, I encourage you to visit the page every time you have some doubts: https://docs.cypress.io/guides/overview/why-cypress.
And why did I choose cypress for this project?
The answer is quite simple: Because I wanted to study it, just like this 😆
Setup
Let’s share the steps I did to create the basic structure of our project.
- Created a GitHub repository 😛 https://github.com/lisboalien/cypress-aquabot-testing
- Cloned the empty project to my computer to start from scrap. (There are many other ways to do these steps, but I usually do these 2 steps first to create a new project).
- I already had Node installed on my computer, so I didn’t have to do that again. But if you don’t have Node installed, you will have to do it.
- Entered inside the project folder and ran the following command to create the package.json file:
npm init -y- Installed cypress with the following command:
npm i cypress --save-dev- Even if you are working with an automation test project, it is a good practice to install cypress as a development dependency, so the parameter –save-dev informs that the package must be installed as a dev dependency.
- And finally, I ran cypress the first time to create the basic cypress structure in my project.
npx cypress openMy purpose here is not to explain how to use cypress in detail, but to show the test process as a whole, so I will jump some explanations. If you would like to know this process in more detail, I highly recommend the Introduction to Cypress course from TAU (Test Automation University).
And that’s it, now we can start thinking about the tests.
All the tests are needed to be created inside the folder cypress/integration, if you followed the same steps that I did, you will notice that there are some examples in there. You can delete them if you don’t like to see them anymore.
First test
In the last post, I put the logo click and Home button click as the first and second test cases, but I will start automating the test case that clicks on the Discover button just because it is easier 😛

First, we need to revisit the test case:
Scenario Test Case <TC> - Navigating to other pages
Given I am on the Aquabot Testing Playground home page
When I click on the <button> button
Then I will be redirected to the <page> page
Examples:
| TC | button          | page                    |
| 03 | Discover        | Types of Buttons        |
So the actions we need to perform are:
- Enter page
- Click on button
- Verify that we were redirected
For entering a page we use the following command:
cy.visit('https://aquabottesting.com/index.html')As every test case starts with the user entering the page, we can put this action in a block that is executed before every test:
beforeEach(() => {
    cy.visit('https://aquabottesting.com/index.html')
})
Now we need to find the button to click on it.
Using the cypress tool, we can just use their suggestion of locator as it is on the image below, or we can find it on the Chrome dev tools.
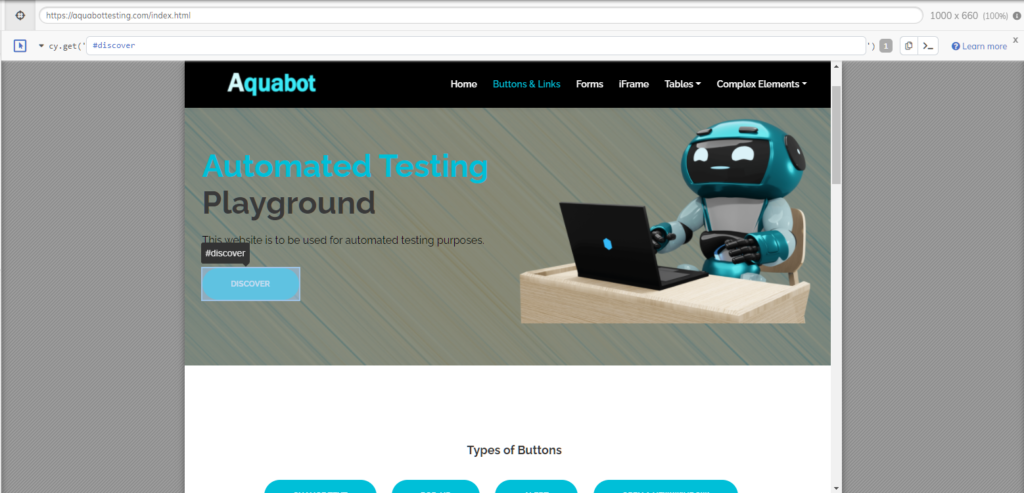
The command to get and click on the button stays like this:
cy.get('#discover').click()Now that we clicked, how do we verify that we were redirected to the page we expected?
One way to do that is to verify the text content of the title Types of Buttons and title Types of Link that are on the same page.
To do that, we need to find the element first and then verify if the text content of the element is the one we expect.
cy.get(':nth-child(1) > .card-title').should('have.text', 'Types of Buttons')
cy.get('.turquoise > .card-title').should('have.text', 'Types of Links')
So the complete test with the beforeEach block will be like this:
beforeEach(() => {
    cy.visit('https://aquabottesting.com/index.html')
})

it('enters Types of Buttons page', () => {
    cy.get('#discover').click()

    cy.get(':nth-child(1) > .card-title').should('have.text', 'Types of Buttons')
    cy.get('.turquoise > .card-title').should('have.text', 'Types of Links')
})
Contains
Now we will do the same test, but clicking on the Buttons & Links button, but we will select the button with the command “contains”. This command gets the DOM element that contains the text passed as a parameter:
cy.contains('Buttons & Links').click()The complete test will be like this:
beforeEach(() => {
    cy.visit('https://aquabottesting.com/index.html')
})

it('clicks on Buttons & Links button and enters Types of Buttons page', () => {
    cy.contains('Buttons & Links').click()

    cy.get(':nth-child(1) > .card-title').should('have.text', 'Types of Buttons')
    cy.get('.turquoise > .card-title').should('have.text', 'Types of Links')
})
That’s it for now!
We will continue automating the other test cases in the next post.